

Hellooooo summer! Sun is out, holidays are approaching and it’s time to make a sundress. For this blog project, I was really spoiled for choice because Jenny has so many beautiful fabrics that would make a gorgeous sundress. After quite a lot of deliberating, I settled on this lovely cotton lawn. Although it is called “winterberry” I think the red berries and green leaves work very well in a sundress. I also decided that it would be sensible to have a nice transitional piece that would pair well with tights and a cardigan on colder days because let’s face it, summer weather in the UK is NOT that predictable.

The Simplicity S9291 (previously known as the Butterick B6453) is a dress which has a fitted princess seam bodice, thin straps and two skirt variations - a fitted pencil skirt or a full gathered skirt. It has a lovely 50s vibe and I’ve actually seen quite a few makes of this pattern popping up in pink gingham to celebrate the release of the Barbie movie! I haven’t made a Big 4 pattern in a while, but I knew I would be in safe hands with more detailed instructions than normal because this pattern actually has a sew-along by the designer on Gertie’s Blog for Better Sewing which talks you through every step, including fitting.
The key thing with this pattern is to measure yourself before ordering and check the measurements on the sizing chart to be certain that you buy the right size. There are two size ranges - A5 and E5. After measuring myself I went for the larger sizing packet because these come up very small. The only disappointing thing with this pattern is the limited size range and lack of inclusion for larger bodies.

I made view A, with the huge gathered skirt and side seam pockets (of course) and decided to do a variation on the straps and make tie-straps instead of installing sliders for adjustable lengths, and also line the bodice rather than use facings as per the pattern. There are only 10 pattern pieces for the variation that I made which was very refreshing and straightforward compared to my previous blog project!

The first thing I did with this project was make a toile of the bodice. I’m still somewhat suspicious about the Big 4 sizing and I wasn’t sure how much ease there would be. I also suspected I would need an FBA based upon the pattern measurements, and I was right. I followed the guidance on Gertie’s blog for this and made the toile out of scrap fabric in my stash. For the FBA, I added 2cm on each side of the bust. I also decided to move the straps of the back closer to the centre by 1.5cm so they covered my bra better. After making these adjustments to the pattern pieces, I made a second toile to check the adjustments and decided to shorten the bodice slightly and take it in at the side seams and under the bust. These adjustments were well worth it and I now have a well fitting bodice with the right amount of ease to be comfortable on a hot day. If you are using facings, remember to adjust these as well. Before cutting into the Lawn fabric, I also shortened the skirt pieces to a length that would be closer to the final fit, to reduce fabric waste.
After taking the time to make sure the pattern were fit, it came together really quickly. It is a very satisfying sew and the lawn was just lovely to handle. It was very enjoyable. Because the print is quite small and busy, it is pretty forgiving and any slight mismatch of the seams isn’t really noticeable. This make was the first time that I had tried a lapped zipper (I’d definitely recommend following the blog for that part) and it was really nice to still try something new in a relatively simple make.

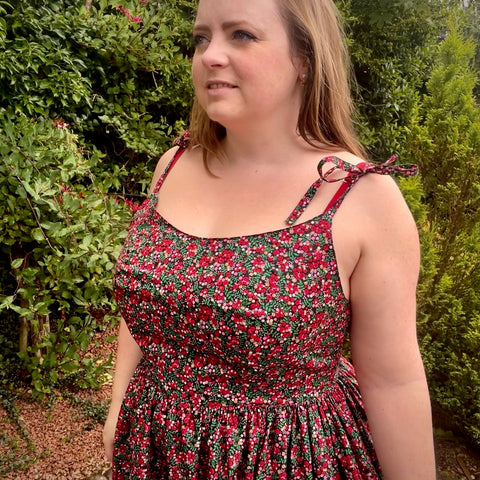
To make the tie straps instead of the adjustable ones, I just cut out the longest strap piece twice for each strap, sewed them separately and attached them at the front and back bodice before tying in a double bow at the shoulder. Instead of following the instructions, I sewed the strap pieces with wrong sides together and turned them through so the seam is hidden. I used Prym loop turners and Clover loop pressing bars to make these which are so helpful when making narrow straps. I think the tie straps give a really pretty effect and I can easily adjust the length if needed.

To gather the skirt, I used a felt mat which makes gathering so easy. You pin the fabric that you are gathering to onto the mat, and then you can use both hands to pull the gathering threads and arrange the gathers evenly before putting pins in. I’d highly recommend trying a felt mat (which you can also use for ironing) if you haven’t before!

For lining the dress, I cut the bodice pieces out twice, used iron-on interfacing along the top of the lining pieces, made two bodices and then joined them together at the neckline, after inserting the straps in between the main bodice and the lining. It was a bit tricky attaching the lining around the lapped zipper as the instructions don’t cover this, so I ended up hand-sewing it down the zip and also hand-sewing to attach along the waistline.

I’m absolutely delighted with the result and I think it’s a really good basic pattern that would be fun to repeat over in different fabrics now that I have the fit nailed. The skirt is massive and great for twirling - it has so much volume that a petticoat isn’t required at all. I’m not wearing one in the photographs so you can see the natural effect.

There is a lot of potential for hacking and variations - it would be easy to attach different skirts such as a circle skirt or pleated skirt if gathered is not your style, add a flounce on the bottom, make a bodice on it’s own as a top, make a little matching waist belt or even play around with the neckline. I love the potential options this solid basic brings, and how cute the result is.
Inspired to make your own version? Here's what you'll need:
Pattern : Simplicity 9291
Fabric : Winterberry Cotton Lawn
[Disclosure: Caroline was provided with the materials for her project free of charge and received a gift voucher in recognition of the time spent on her project.]