Hey Stitchers! It’s me Rheanne and I’m back again with a new blog post. It’s been a bit crazy for me over the last few months (home renovations, changing jobs, adopting two kittens… you get the idea), so I’m super excited to be back and have time for sewing again.
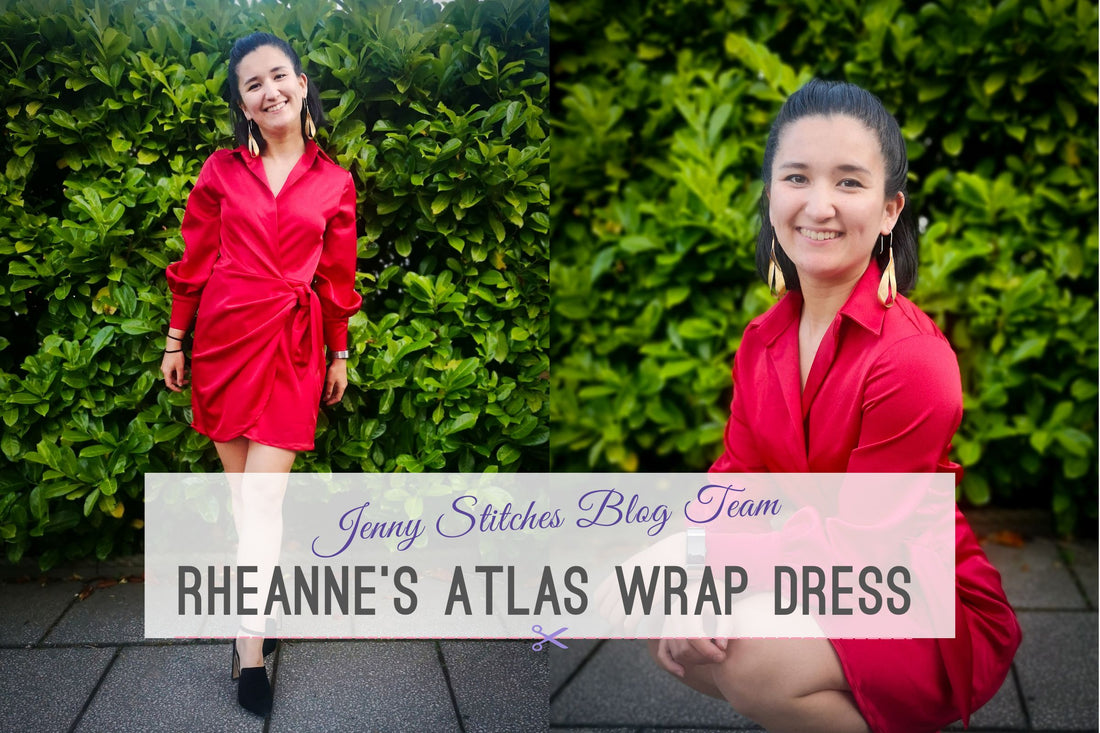
This time I’ve made the absolutely gorgeous Atlas Wrap Dress from Sewing Masin. The pattern is beautifully designed and the red satin fabric from Jenny was perfect with a lovely drape, which altogether made for a fabulous dress that I’m really pleased with. I went with view B with the full sleeves, inspired by Masin’s gorgeous version in green, and only made a few adjustments for my petite size. I’ve gathered a few thoughts about this make and am now sharing all and my results with you in this post, hope you enjoy!

The Materials
All my supplies were from Jenny, who is fabulous as ever in her new shop (if you haven’t visited yet it’s a massive space and well worth a trip). I got the pattern from Sewing Masin as a pdf file which Jenny then printed out for me via her A0 printer. I love pdf patterns for this reason as you can always get another copy printed if you need to, e.g. for a different size or if you like making alternations to your patterns - but more on that later.
Fabric-wise, I chose a stunning, red, crepe-backed satin in “lipstick” which has a gorgeous drape. The fabric is pretty easy to use; it was a little bit slippery at times (pins were needed, particularly when working right sides together!), but the best thing I loved about it was that it doesn’t fray. The fabric has a beautiful satin finish which gives such a luxurious finish to this pattern, while the crepe backing stabilises the fabric so it’s less slippery. The crepe does make the fabric a little heavier than satin on its own, so if you use it make sure to give seams a good press so they stay nice and flat.
The pattern also calls for two buttons for the cuffs which I kept simple and then I got a little bit of interfacing for the collar. While I don’t mind inserting zips and buttons, for me the fewer fastenings in a pattern, the better! There’s something I love about garments which are easy to slip on; they’re just fuss-free and effortless in my book. Finally, I picked up some matching thread from Jenny and then was good to go!

The Pattern
As always with Sewing Masin patterns, the instructions were super clear and easy to follow. I always find that I learn something when using her patterns. This pattern is a wrap-style shirt dress, with a collar, bishop-style sleeves complete with cuffs and a curved hem. On this occasion the slightly tricky part of the pattern for me was the placket on the cuffs. Luckily, Masin’s instructions make it super easy, so if you’ve never sewn plackets before I would highly recommend this pattern as it takes you through all the steps and they ended up looking absolutely gorgeous.
The pattern takes you through making the skirt, then the bodice and joining it to the skirt, then making the sleeves and setting them in. One thing that did confuse me a little bit with the skirt and bodice is that the half of the skirt that sits nearest the body has an edge that extends beyond the front edge of the bodice top (ie. the edges don’t line up). As this was a bit new to me I stuck with it and followed the instructions exactly, finding out that this is how it’s meant to be. The reason why is that you want the bodice top to sit straight down the centre front while the skirt has to extend around to meet the inside tie. This gives you that sleek shirt look while also giving you the gorgeous drapey wrap around skirt.

My Adjustments
To adapt to my slightly smaller frame, I decided to first make a toile in order to check the measurements. I have a small bust (30C) and a slightly shorter torso than average so I found that my toile, while perfectly wearable was a little gapey at the front because of extra length in the pattern than I needed. The solution to this was to shorten the bodice by an inch which reduced the extra fabric and thus prevented the gaping - hurrah!
I found that the cuffs on first fit were also a little tight for my liking, particularly when lifting my arms. I moved the button nearer to the edge of the cuff and this gave me enough ease to be comfortable when I lifted my arms up to the front. If you’re making this pattern, double check that the fit of the cuffs and button placement allow enough ease as you may want to add an extra cm or two to the cuffs for comfort.


The Final Verdict
Once I’d finished adding in all the final touches, added buttons and given it a final press, my Atlas Wrap dress was ready to go! I’m super pleased with the fit and the satin fabric makes it feel super luxurious. The style of the dress is gorgeous and makes me feels so elegant and classy when wearing it. It’s perfect for a night out with a pair of heels or dressed down with trainers for a more casual occasion, or even or a photoshoot date with a kitty for the blog! Stitchers, meet Jessie, one of the newest additions to my crazy world!
If you’re thinking of making a wrap shirt dress, I’d definitely recommend giving this pattern a go. There’s two versions; view A would look gorgeous in a poplin for a more structured look or view B could make for a stunning evening look, perhaps with lots of sparkle for that added wow factor. I’d also highly recommend the satin fabric and there’s a few colours to choose from. It would be perfect for things like a Slip Dress and is so so lovely to work with.
Overall I’m super happy with how this dress turned out and am so glad to be back sewing. I’ll be back soon with another blog post so in the meantime I hope you have a lovely time with this pattern and fabric and happy sewing!

Inspired to make your own version? Here's what you'll need:
Inspired to make your own version? Here's what you'll need:

[Disclosure: Rheanne was provided with the materials for her project free of charge and received a gift voucher in recognition of the time spent on her project.]
1 comment
Wow – love that fabric. And the dress looks amazing